The Ultimate Guide to Restoring Your Headlights: Achieve Crystal Clear Vision on the Road
All you need to know about headlight restoration!
Garage Finds
Driving with hazy, yellowed headlights not only compromises your vehicle's aesthetics but also poses a safety risk. Dim headlights can significantly reduce visibility, especially during nighttime driving or adverse weather conditions. Fortunately, you can restore your headlights to their former glory, improving both appearance and safety. In this comprehensive guide, we will explore the reasons to restore your headlights, how to identify when restoration is needed, the products and processes to use, and step-by-step instructions for achieving long-lasting results.
Why Restore Your Headlights?
Safety Enhancement: Clear and bright headlights provide optimal illumination, improving your visibility on the road and reducing the risk of accidents.
Cost Savings: Restoring headlights is a cost-effective alternative to replacing them entirely, which can be a pricy endeavor.
Vehicle Aesthetics: Restoring your headlights can significantly enhance your vehicle's overall appearance, giving it a fresh, well-maintained look.
Identifying the Need for Restoration: To determine if your headlights require restoration, look out for the following signs:
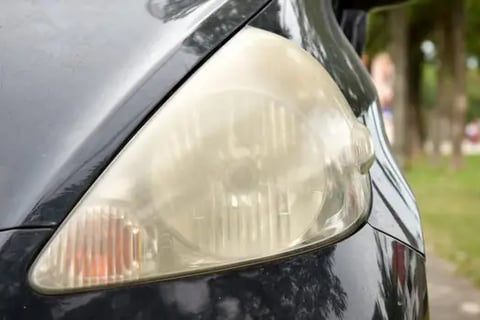
Cloudy or Hazy Appearance: The headlights may appear yellowed, foggy, or oxidized.
Reduced Light Output: Dim headlights that fail to provide adequate illumination on the road.
Scratches and Pitting: If the headlight surface has visible scratches or pitting, restoration is necessary.


Choosing the Right Products: To achieve optimal results, it's crucial to select high-quality products specifically designed for headlight restoration. Here are some recommended products:
Sandpaper: 800-grit, 1000-grit, 1500-grit, and 2000-grit sandpaper for the sanding process.
Headlight Restoration Kit: Kits like the "Meguiar's Two Step Headlight Restoration Kit" or the "3M 39008 Headlight Lens Restoration System" are popular choices and contain various restoration components.
UV Protective Sealant: A UV-resistant sealant, such as the "Turtle Wax T-43 (2-in-1) Headlight Cleaner and Sealant," helps protect the restored headlights from future damage.
Step-by-Step Restoration Process:
Preparation:
a. Start by gathering all the necessary materials and ensuring you have a well-ventilated work area.
b. Clean the headlight surface using a mild detergent and water, removing any dirt, grime, or debris. Rinse thoroughly and dry the headlights with a clean, lint-free cloth.
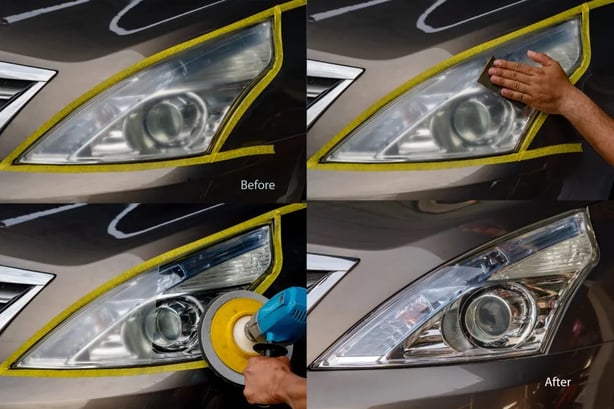
c. To protect the surrounding areas of the headlights from accidental damage, apply masking tape around the edges, leaving only the headlight surface exposed.
Sanding:
a. Begin with the lowest grit sandpaper, such as 800-grit, and soak it in water for a few minutes to ensure it is wet sanding. This helps to lubricate the surface and prevent excessive scratching.
b. Holding the sandpaper firmly, start sanding the headlight surface in a horizontal motion, applying moderate pressure. Keep the sandpaper and headlight surface wet throughout the process.
c. After a few passes, switch to a vertical motion and continue sanding. This crosshatch pattern ensures even sanding and helps remove scratches and oxidation effectively.
d. Repeat the sanding process with progressively higher grit sandpapers, such as 1000-grit, 1500-grit, and finally 2000-grit, following the same wet sanding technique. This gradually smoothes the surface and removes deeper imperfections.
Polishing:
a. Apply a small amount of polishing compound from the restoration kit onto a clean, soft cloth or a foam applicator pad included in the kit.
b. Working on one section of the headlight at a time, use moderate pressure and circular motions to apply the polishing compound evenly. Focus on areas with remaining scratches, cloudiness, or oxidation.
c. Continue polishing until the headlight surface appears clear and free of defects. You may need to apply more polishing compound as needed. d. Once satisfied with the results, wipe off the excess compound using a clean, microfiber cloth.
Application of UV Protective Sealant:
a. Follow the instructions provided with the UV protective sealant product as application methods may vary.
b. Generally, apply a thin, even layer of the sealant to the entire headlight surface, using a clean applicator pad or a soft cloth.
c. Allow the sealant to dry completely according to the manufacturer's instructions before exposing the headlights to water or extreme conditions. This typically takes a few minutes to several hours, depending on the product.
Final Touches:
a. Carefully remove the masking tape from the surrounding areas, ensuring you don't accidentally touch the restored headlight surface.
b. Clean the surrounding area and wipe down the entire headlight to remove any residue from the restoration process, revealing the transformed headlights in their full clarity and shine.
c. Repeat the restoration process for the other headlight, following the same steps and techniques, to achieve a uniform appearance.


Restoring your headlights is a simple yet highly beneficial process that enhances safety, saves money, and improves the overall appearance of your vehicle. By following the steps outlined in this guide and using the recommended products, you can achieve crystal-clear headlights that provide optimal visibility on the road. Don't let cloudy headlights hinder your driving experience; restore them today and enjoy safer and more enjoyable journeys ahead.
Remember, it's always crucial to refer to the specific instructions provided by the product manufacturer to ensure the best results. Stay safe, maintain clear vision, and enjoy the road ahead!


